Plug-ins for Blender, 3ds Max, Revit and Rhino
Install the plug-in, connect your studio with a code and publish the model straight into a tour, with library materials.
Besides the SketchUp extension, vr-tecture has plug-ins for Blender, 3ds Max, Revit and Rhino. Each one connects to your studio with a code, so no password is typed in the design software, and publishes the model straight into a tour: a new tour, a new space or style of an existing tour, or a replacement for a style you published before.
These four plug-ins are new. If something does not work on your computer, tell us the software and its version; the manual routes below keep working in the meantime.
| Software | Versions | Download | Library materials | Catalog products | Persian |
|---|---|---|---|---|---|
| Blender | 4.2 and later | vrtecture-blender-0.1.0.zip | Yes | Yes | No |
| 3ds Max | 2022 to 2027 | vrtecture-3dsmax-0.1.1.zip | Yes | Yes | Yes |
| Revit | 2022 to 2027 | vrtecture-revit-0.1.1.zip | Yes | No | Yes |
| Rhino | 7 and 8 | vrtecture-rhino-0.1.1.zip | Yes | No | No |
Connected apps are part of the Studio and Developer plans.
Install
Blender
- In Blender, open Edit › Preferences › Get Extensions, open the menu at the top right and choose Install from Disk.
- Choose the downloaded .zip. Blender asks to allow online access; the plug-in needs it to publish.
- In the 3D viewport press N and open the vr-tecture tab.
3ds Max
- Close 3ds Max and unzip the download.
- Copy the folder vrtecture.bundle into %APPDATA%\Autodesk\ApplicationPlugins (paste that line into the address bar of File Explorer; create the last folder if it is not there).
- Start 3ds Max. A vr-tecture menu appears in the main menu bar.
Revit
- Close Revit, unzip the download and double-click install.cmd.
- Start Revit. It asks once whether to load the add-in: choose Always Load.
- The button is on the Add-Ins tab, in the vr-tecture panel.
Rhino
- Unzip the download. If Windows blocked the file, right-click Vrtecture.Rhino.rhp, choose Properties and tick Unblock.
- Drag the .rhp file onto the Rhino window.
- The plug-in works from the command line: vrtConnect, vrtPublish, vrtMaterial, vrtDisconnect.
Connect your studio
- Select Connect account (in Rhino: type vrtConnect). Your browser opens the studio and the plug-in shows a code.
- Sign in to the studio if you are not, check that the code is the same and approve it.
- The plug-in shows your name and plan. Each computer is listed under connected apps in the studio, where you can disconnect it.
Publish
- Show what visitors should walk through and hide the rest. In Revit, open a 3D view: the add-in publishes what that view shows, section box included.
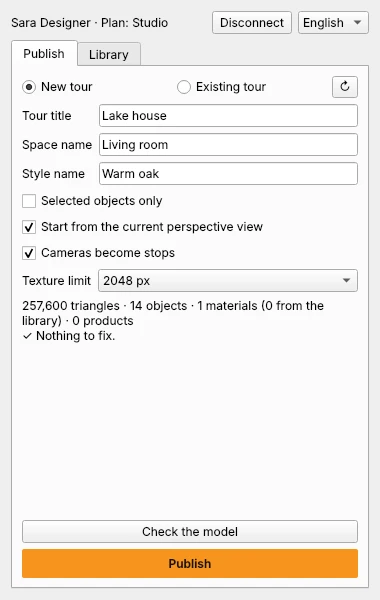
- Choose New tour and give the tour, the space and the style a name; or choose Existing tour and pick the tour, the space and whether the model replaces a style or becomes a new one.
- Select Check the model to see the triangle count and anything that would be left out, then Publish.
- Open the tour with Open the tour or send your client the link with Copy link.
The plug-in remembers which tour the file was published to. Publishing again updates the same style; prices and client choices you set in the studio stay.
| Where visitors start | Blender: the scene camera, else the viewport. 3ds Max and Rhino: the perspective viewport. Revit: the open perspective 3D view. The camera has to stand inside the model. |
|---|---|
| Stops of the guided tour | Blender and 3ds Max: the other cameras. Revit: the other perspective 3D views. Rhino: perspective Named Views. Each stop takes the camera’s or view’s name. |
| Texture limit | Larger textures are scaled down in the published model only; your file is not changed. 2048 px suits most tours. |
| Units | Converted to metres automatically. |
Library materials and products
A material from the vr-tecture library is shown in the tour at full quality and true scale, and your client can swap it for the alternatives you allow (see Dress surfaces with real materials). In Blender and 3ds Max, open the Library tab, pick a material and apply it to the selection. In Revit, Create the material adds it to the project so you can paint it on faces or use it in your types. In Rhino, vrtMaterial lists the library and applies your pick to the selected objects.
In Blender and 3ds Max the Library tab also holds the catalog’s 3D products. A product placed in the scene becomes an item your client can open and ask about in the tour (see Let clients swap furniture and fixtures). 3ds Max shows a box of the product’s size; the real model takes its place when you publish.
What does not travel
- 3ds Max: colour, colour texture, roughness, metalness, transparency and true normal maps of Physical, Standard, V-Ray and Corona materials travel. Roughness maps, procedural maps and grey bump maps do not.
- Revit: the colour, transparency and the image of each material’s appearance travel. Relief patterns and decals do not.
- Blender: what Blender’s own glTF export carries from a Principled BSDF. Procedural node setups need baking first.
- Rhino: the material’s colour, transparency and its colour image. Texture repeat set on the material does not travel yet.
Whatever is left out is listed after publishing. For surfaces that came out plain, use Finishes in the studio.
Archicad, Vectorworks and other BIM software
These need no plug-in: export IFC and upload it. See Upload a BIM model (IFC). For software that exports glTF, FBX or OBJ, see Export from Blender, 3ds Max and other tools.